
I got started using these instructions, but they did not work for me out of the box. It seems the default Telegraf Docker Image is missing some SNMP tools / mibs files to function.
Here is how I got it working on my Synology NAS…
Start Default Telegraf Docker Container
We download and start the container with default config, we will later override that config so that we get Synology logging enabled. If we start the container with the “Synology” config already, it will never start because the standard MIBs files are missing and the error stops the container…
So to get started with a working container:
- In the Synology user interface, open the Docker Package
- Download and launch telegraf:latest Docker image
- A Create Container Dialog opens, go to Advanced Settings and apply:
- Volume -> Add Folder -> mibs folder -> /usr/share/snmp/mibs
- Network-> Check “Use the same network as Docker Host“
- Complete the creating process to launch the Docker container, it should say “Running” when you switch to “Container” in der Docker Add-on, similar to this:

- Log into the running container
- Login to Synology NAS using SSH, see this how-to if you need help with that
- Run
sudo docker ps - your output should show a running telegraf container:

- We need the name of the running container, in my case “telegraf1”
- we open a shell inside the container by running
sudo docker exec -it telegraf1 /bin/bash(where you need to replace “telegraf1” with your container name)
Install the missing MIBs files
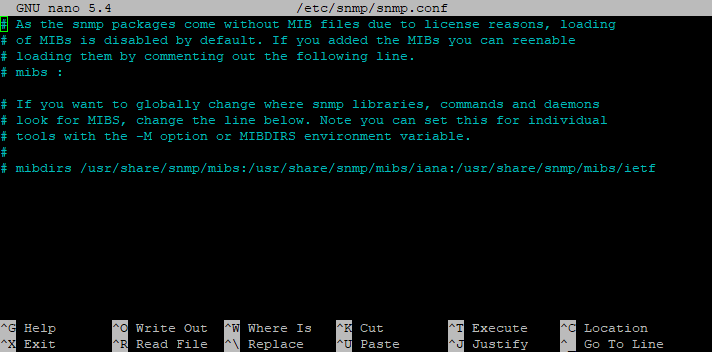
- In the container shell, we first get ourselves a text editor and enable MIBs loading:
apt-get update– update the package managerapt-get upgrade– upgrade all packagesapt-get install nano– install an editor, so we can edit files- open snmp.conf using
nano /etc/snmp/snmp.conf - using your cursor, comment out line 4 using an “#” and save the file by pressing ctr+x and entering “Y“
- Now, we actually add the MIBs
- When we run
snmptranslate -Tpwe see that the MIBs files are missing - We install them, roughly following this guide but with some extra steps…
- First, we need to add “non-free” packages to our source list, so we can install the MIBs packages
sudo nano /etc/apt/sources.list- add “non-free” to all non-commented lines (2, 4, 6 in my case) like so

- close nano saving the file as before
- Update package list, like before using
apt-get update
- Finally we can download all MIBs using
apt-get install snmp-mibs-downloader - Now when we run
snmptranslate -Tp, we should see a loooong and complicated looking table/tree with lots of entries:
- We are done “inside” the container, so we can leave with
exit
- When we run
Restart container with Synology Config
Now that we have installed and enabled the missing MIBs, we can start our container with the real “functional” configuration file.
- Back in the Synology Docker Add-On, under “Container” stop the running telegraf container
- Edit the container and add another Volume
- docker/telegraf/conf -> /etc/telegraf
- Start the container, in the logs the last entry should read
“Using config file: /etc/telegraf/telegraf.conf”